webpack 源码解析
序言
项目上在使用webpack,感叹真是神器,既然是神器,就想探知究竟。
总览
webpack整体是一个插件架构,所有的功能都以插件的方式集成在构建流程中,通过发布订阅事件来触发各个插件执行。webpack核心使用Tapable 来实现插件(plugins)的binding和applying.
先整体来看一下webpack事件流:通过在Tapable中打日志获得
         method                       event-name
--------------------------------------------------
applyPluginsBailResult           |   entry-option
applyPlugins                     |   after-plugins
applyPlugins                     |   after-resolvers
applyPlugins                     |   environment
applyPlugins                     |   after-environment
applyPluginsAsync                |   before-run
applyPluginsAsyncSeries          |   run
applyPlugins                     |   normal-module-factory
applyPlugins                     |   context-module-factory
applyPlugins                     |   compile
applyPlugins                     |   this-compilation
applyPlugins                     |   compilation
applyPluginsParallel             |   make
applyPluginsAsyncWaterfall       |   before-resolve
applyPluginsWaterfall            |   factory
applyPluginsWaterfall            |   resolver
applyPlugins                     |   resolve
applyPlugins                     |   resolve-step
applyPluginsParallelBailResult   |   file
applyPluginsParallelBailResult   |   directory
applyPlugins                     |   resolve-step
applyPluginsParallelBailResult   |   result
applyPluginsAsyncWaterfall       |   after-resolve
applyPluginsBailResult           |   create-module
applyPluginsWaterfall            |   module
applyPlugins                     |   build-module
applyPlugins                     |   normal-module-loader
applyPluginsBailResult           |   program
applyPluginsBailResult           |   statement
applyPluginsBailResult           |   evaluate MemberExpression
applyPluginsBailResult           |   evaluate Identifier document.write
applyPluginsBailResult           |   call document.write
applyPluginsBailResult           |   expression document.write
applyPluginsBailResult           |   expression document
applyPlugins                     |   succeed-module
applyPlugins                     |   seal
applyPlugins                     |   optimize
applyPlugins                     |   optimize-modules
applyPlugins                     |   after-optimize-modules
applyPlugins                     |   optimize-chunks
applyPlugins                     |   after-optimize-chunks
applyPluginsAsyncSeries          |   optimize-tree
applyPlugins                     |   after-optimize-tree
applyPluginsBailResult           |   should-record
applyPlugins                     |   revive-modules
applyPlugins                     |   optimize-module-order
applyPlugins                     |   before-module-ids
applyPlugins                     |   optimize-module-ids
applyPlugins                     |   after-optimize-module-ids
applyPlugins                     |   record-modules
applyPlugins                     |   revive-chunks
applyPlugins                     |   optimize-chunk-order
applyPlugins                     |   before-chunk-ids
applyPlugins                     |   optimize-chunk-ids
applyPlugins                     |   after-optimize-chunk-ids
applyPlugins                     |   record-chunks
applyPlugins                     |   before-hash
applyPlugins                     |   hash
applyPlugins                     |   hash
applyPlugins                     |   hash
applyPlugins                     |   hash
applyPlugins                     |   hash-for-chunk
applyPlugins                     |   chunk-hash
applyPlugins                     |   after-hash
applyPlugins                     |   before-chunk-assets
applyPluginsWaterfall            |   global-hash-paths
applyPluginsBailResult           |   global-hash
applyPluginsWaterfall            |   bootstrap
applyPluginsWaterfall            |   local-vars
applyPluginsWaterfall            |   require
applyPluginsWaterfall            |   module-obj
applyPluginsWaterfall            |   module-require
applyPluginsWaterfall            |   require-extensions
applyPluginsWaterfall            |   asset-path
applyPluginsWaterfall            |   startup
applyPluginsWaterfall            |   module-require
applyPluginsWaterfall            |   render
applyPluginsWaterfall            |   module
applyPluginsWaterfall            |   render
applyPluginsWaterfall            |   package
applyPluginsWaterfall            |   modules
applyPluginsWaterfall            |   render-with-entry
applyPluginsWaterfall            |   asset-path
applyPlugins                     |   chunk-asset
applyPlugins                     |   additional-chunk-assets
applyPlugins                     |   record
applyPluginsAsyncSeries          |   additional-assets
applyPluginsAsyncSeries          |   optimize-chunk-assets
applyPlugins                     |   after-optimize-chunk-assets
applyPluginsAsyncSeries          |   optimize-assets
applyPlugins                     |   after-optimize-assets
applyPluginsAsyncSeries          |   after-compile
applyPluginsBailResult           |   should-emit
applyPluginsAsyncSeries          |   emit
applyPluginsWaterfall            |   asset-path
applyPluginsAsyncSeries          |   after-emit
applyPlugins                     |   done
其中有几个关键节段对应的事件分别是:
-
entry-option初始化option -
run开始编译 -
make从entry开始递归的分析依赖,对每个依赖模块进行build -
before-resolve-after-resolve对其中一个模块位置进行解析 -
build-module开始构建 (build) 这个module,这里将使用文件对应的loader加载 -
normal-module-loader对用loader加载完成的module(是一段js代码)进行编译,用 acorn 编译,生成ast抽象语法树。 -
program开始对ast进行遍历,当遇到require等一些调用表达式时,触发call require事件的handler执行,收集依赖,并。如:AMDRequireDependenciesBlockParserPlugin等 -
seal所有依赖build完成,下面将开始对chunk进行优化,比如合并,抽取公共模块,加hash -
bootstrap生成启动代码 -
emit把各个chunk输出到结果文件
webpack的关键实体
模块,依赖,模块工厂
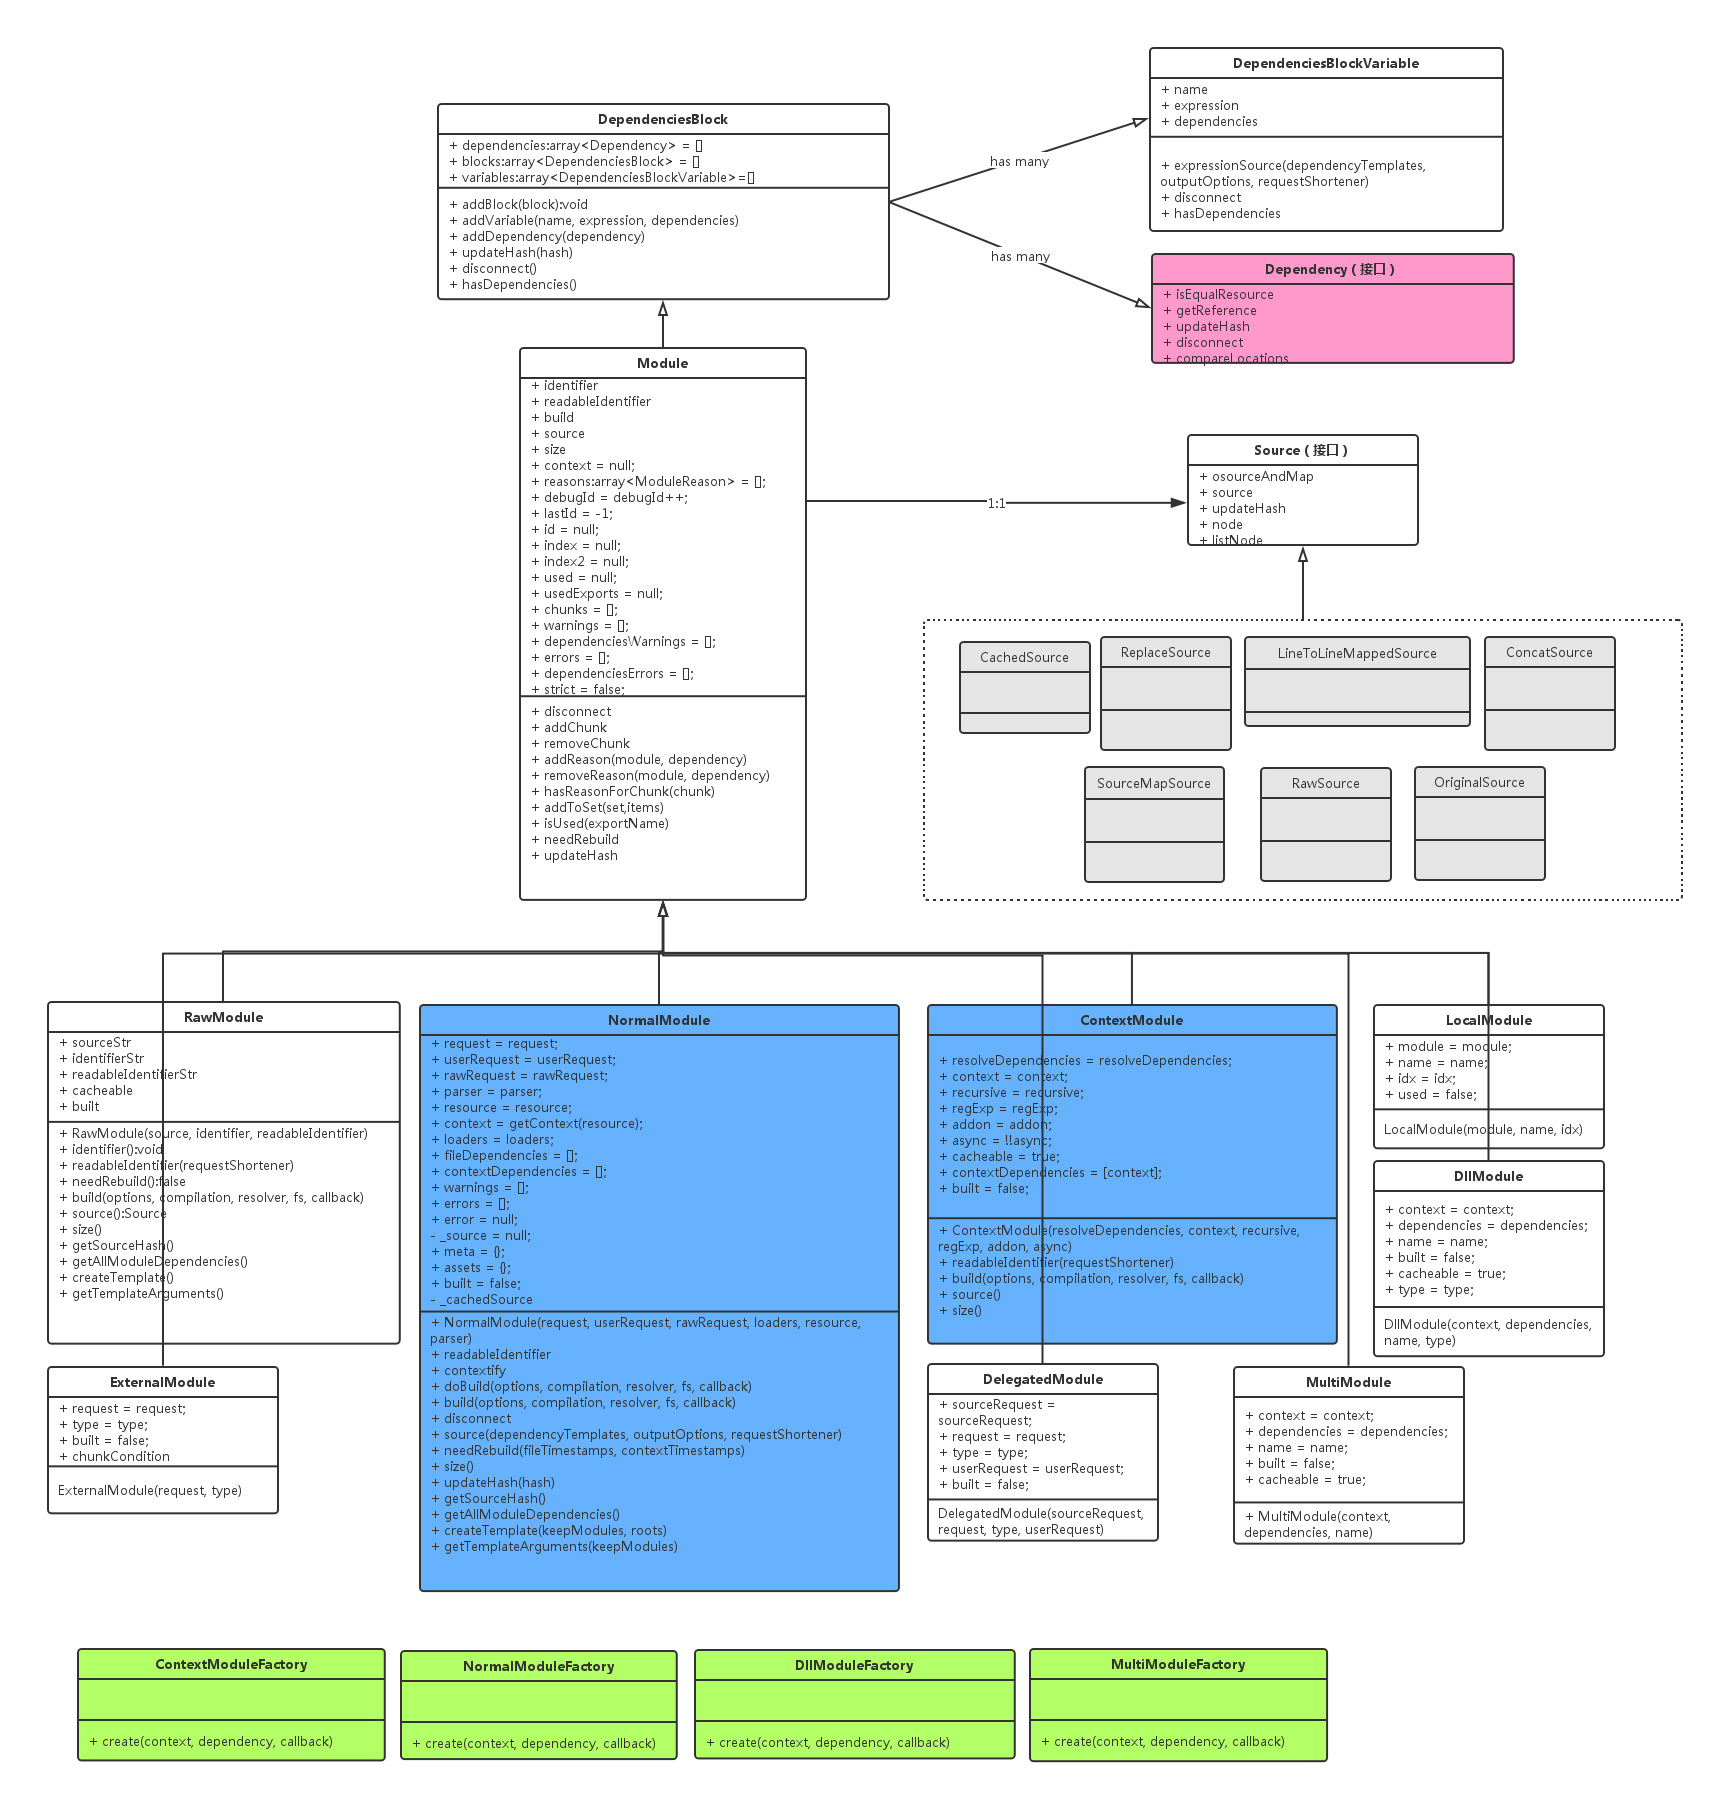
模块
Module是webpack的中的核心实体,要加载的一切和所有的依赖都是Module,总之一切都是Module。它有很多子类:RawModule,NormalModule ,MultiModule,ContextModule,DelegatedModule,DllModule,ExternalModule 等
依赖
每一个依赖(Dependency)的实体都包含一个module字段,指向被依赖的Module. 这样通过Module的dependencies数组成员就能找出该模块所依赖的其它模块。
webpack使用不同的Dependency子类,如AMDRequireDependency ,AMDDefineDependency ,AMDRequireArrayDependency,CommonJsRequireDependency,SystemImportDependency来表式不同的模块加载规范,
通过对应的DependencyParserPlugin来加载 AMD或CMD的模块。 后面会专门讲不同DependencyParserPlugin的实现方式 。
依赖模版Template
每个依赖都有相应Template,用来生成加载该依赖模块的js代码。
模块工厂
使用工厂模式创建不同的Module,有四个主要的子类: NormalModuleFactory,ContextModuleFactory , DllModuleFactory,MultiModuleFactory.
调用过程
webpack的实际入口是Compiler类的run方法, 在run方法里调用compile方法开始编译。在编译的时候会使用一个核心对象:Compilation.
核心对象Compilation
该对象负责组织整个编译过程,包含了每个构建环节所对应的方法,如:addEntry ,buildModule,processModuleDependencies,summarizeDependencies,createModuleAssets,createHash等等。
- 主要的成员
参考源码:
        this.compiler = compiler;       //Compiler对象的引用
        this.resolvers = compiler.resolvers;   //模块解析器
        this.inputFileSystem = compiler.inputFileSystem;

        var options = this.options = compiler.options;
        this.outputOptions = options && options.output;
        this.bail = options && options.bail;
        this.profile = options && options.profile;

        this.mainTemplate = new MainTemplate(this.outputOptions);   //这里Template是用来生成js结果文件的。
        this.chunkTemplate = new ChunkTemplate(this.outputOptions, this.mainTemplate);
        this.hotUpdateChunkTemplate = new HotUpdateChunkTemplate(this.outputOptions);
        this.moduleTemplate = new ModuleTemplate(this.outputOptions);

        this.entries = [];              //入口
        this.preparedChunks = [];        //预先加载的chunk
        this.chunks = [];                                //所有的chunk
        this.namedChunks = {};                        //每个都对应一个名子,可以通过namedChunks[name]获取chunk
        this.modules = [];              //所有module
        this._modules = {};
        this.cache = null;
        this.records = null;
        this.nextFreeModuleId = 0;
        this.nextFreeChunkId = 0;
        this.nextFreeModuleIndex = 0;
        this.nextFreeModuleIndex2 = 0;
        this.additionalChunkAssets = [];
        this.assets = {};                                //保存所有生成的文件
        this.errors = [];
        this.warnings = [];
        this.children = [];            // 保存子Compilation对象,子Compilation对象依赖它的上级Compilation对象生成的结果,所以要等父Compilation编译完成才能开始。
        this.dependencyFactories = new ArrayMap();   //保存Dependency和ModuleFactory的对应关系,方便创建该依赖对应的Module
        this.dependencyTemplates = new ArrayMap();   //保存Dependency和Template对应关系,方便生成加载此模块的代码
- 程序核心处理流程注释
SingleEntryPlugin,MultiEntryPlugin 两个插件中注册了对make事件的监听,当Compiler执行make时,触发对 Compilation.addEntry 方法的调用. 在addEntry方法内调用私有方法_addModuleChain :
Compilation.prototype._addModuleChain = function process(context, dependency, onModule, callback) {
	var start = this.profile && +new Date();

	var errorAndCallback = this.bail ? function errorAndCallback(err) {
		callback(err);
	} : function errorAndCallback(err) {
		err.dependencies = [dependency];
		this.errors.push(err);
		callback();
	}.bind(this);

	if(typeof dependency !== "object" || dependency === null || !dependency.constructor) {
		throw new Error("Parameter 'dependency' must be a Dependency");
	}

    //根据依赖模块的类型获取对应的模块工厂,用于后边创建模块。
	var moduleFactory = this.dependencyFactories.get(dependency.constructor);
	if(!moduleFactory) {
		throw new Error("No dependency factory available for this dependency type: " + dependency.constructor.name);
	}

    //使用模块工厂创建模块,并将创建出来的module作为参数传给回调方法:就是下边`function(err, module)`的参数
	moduleFactory.create(context, dependency, function(err, module) {
		if(err) {
			return errorAndCallback(new EntryModuleNotFoundError(err));
		}

		if(this.profile) {
			if(!module.profile) {
				module.profile = {};
			}
			var afterFactory = +new Date();
			module.profile.factory = afterFactory - start;
		}

		var result = this.addModule(module);

        //result表示该module是否第一次创建
		if(!result) {
            //不是第一次创建
			module = this.getModule(module);

			onModule(module);

			if(this.profile) {
				var afterBuilding = +new Date();
				module.profile.building = afterBuilding - afterFactory;
			}

			return callback(null, module);
		}

        //如果module已缓存过,且不需要rebuild。result是一个Module对象,直接返回该缓存的module
		if(result instanceof Module) {
			if(this.profile) {
				result.profile = module.profile;
			}

			module = result;

			onModule(module);

			moduleReady.call(this);
			return;
		}


		onModule(module);

        //下面要对module进行build了。包括调用loader处理源文件,使用acorn生成AST,将遍历AST,遇到requirt等依赖时,创建依赖(Dependency)加入依赖数组.
		this.buildModule(module, function(err) {
			if(err) {
				return errorAndCallback(err);
			}

			if(this.profile) {
				var afterBuilding = +new Date();
				module.profile.building = afterBuilding - afterFactory;
			}

        //OK,这里module已经build完了,依赖也收集好了,开始处理依赖的module
			moduleReady.call(this);
		}.bind(this));

		function moduleReady() {
			this.processModuleDependencies(module, function(err) {
				if(err) {
					return callback(err);
				}

				return callback(null, module);
			});
		}
	}.bind(this));
};
- 递归处理依赖
经过上面buildModule后,程序调用processModuleDependencies开始递归处理依赖的module.:
Compilation.prototype.addModuleDependencies = function(module, dependencies, bail, cacheGroup, recursive, callback) {
	var _this = this;
	var start = _this.profile && +new Date();

	var factories = [];
	for(var i = 0; i < dependencies.length; i++) {
		var factory = _this.dependencyFactories.get(dependencies[i][0].constructor);
		if(!factory) {
			return callback(new Error("No module factory available for dependency type: " + dependencies[i][0].constructor.name));
		}
		factories[i] = [factory, dependencies[i]];
	}

    //遍历每个依赖模块
	async.forEach(factories, function(item, callback) {

        //这下面跟上面处理_addModuleChain方法类似

		var dependencies = item[1];
		var criticalDependencies = dependencies.filter(function(d) {
			return !!d.critical;
		});
		if(criticalDependencies.length > 0) {
			_this.warnings.push(new CriticalDependenciesWarning(module, criticalDependencies));
		}

		var errorAndCallback = function errorAndCallback(err) {
			err.dependencies = dependencies;
			err.origin = module;
			module.dependenciesErrors.push(err);
			_this.errors.push(err);
			if(bail) {
				callback(err);
			} else {
				callback();
			}
		};
		var warningAndCallback = function warningAndCallback(err) {
			err.dependencies = dependencies;
			err.origin = module;
			module.dependenciesWarnings.push(err);
			_this.warnings.push(err);
			callback();
		};

		var factory = item[0];

        //创建Module
		factory.create(module.context, dependencies[0], function(err, dependentModule) {
			function isOptional() {
				return dependencies.filter(function(d) {
					return !d.optional;
				}).length === 0;
			}

			function errorOrWarningAndCallback(err) {
				if(isOptional()) {
					return warningAndCallback(err);
				} else {
					return errorAndCallback(err);
				}
			}
			if(err) {
				return errorOrWarningAndCallback(new ModuleNotFoundError(module, err));
			}
			if(!dependentModule) {
				return process.nextTick(callback);
			}
			if(_this.profile) {
				if(!dependentModule.profile) {
					dependentModule.profile = {};
				}
				var afterFactory = +new Date();
				dependentModule.profile.factory = afterFactory - start;
			}

			dependentModule.issuer = module.identifier();
			var newModule = _this.addModule(dependentModule, cacheGroup);

			if(!newModule) { // from cache
				dependentModule = _this.getModule(dependentModule);

				if(dependentModule.optional) {
					dependentModule.optional = isOptional();
				}

				dependencies.forEach(function(dep) {
					dep.module = dependentModule;
					dependentModule.addReason(module, dep);
				});

				if(_this.profile) {
					if(!module.profile) {
						module.profile = {};
					}
					var time = +new Date() - start;
					if(!module.profile.dependencies || time > module.profile.dependencies) {
						module.profile.dependencies = time;
					}
				}

				return process.nextTick(callback);
			}

			if(newModule instanceof Module) {
				if(_this.profile) {
					newModule.profile = dependentModule.profile;
				}

				newModule.optional = isOptional();
				newModule.issuer = dependentModule.issuer;
				dependentModule = newModule;

				dependencies.forEach(function(dep) {
					dep.module = dependentModule;
					dependentModule.addReason(module, dep);
				});

				if(_this.profile) {
					var afterBuilding = +new Date();
					module.profile.building = afterBuilding - afterFactory;
				}

				if(recursive) {
					return process.nextTick(_this.processModuleDependencies.bind(_this, dependentModule, callback));
				} else {
					return process.nextTick(callback);
				}
			}

			dependentModule.optional = isOptional();

			dependencies.forEach(function(dep) {
				dep.module = dependentModule;
				dependentModule.addReason(module, dep);
			});

            //build模块
			_this.buildModule(dependentModule, function(err) {
				if(err) {
					return errorOrWarningAndCallback(err);
				}

				if(_this.profile) {
					var afterBuilding = +new Date();
					dependentModule.profile.building = afterBuilding - afterFactory;
				}

                //循环处理此模块的依赖
				if(recursive) {
					_this.processModuleDependencies(dependentModule, callback);
				} else {
					return callback();
				}
			});

		});
	}, function(err) {
		if(err) {
			return callback(err);
		}

		return callback();
	});
};
- 所有模块build完成,开始封装
调用seal方法封装,要逐次对每个module和chunk进行整理,生成编译后的源码,合并,拆分,生成hash。
webpack会根据不同的插件,如MinChunkSizePlugin,LimitChunkCountPlugin 将不同的module整理到不同的chunk里,每个chunk最终对应一个输出文件。此时所有的module仍然保存的是编译前的
原始文件内容。webpack需求将源代码里的require()调用替换成webpack模块加载代码,说白了就是生成最终编译后的代码。
通过Template生成结果代码
生成结果js的调用入口,是compilation类里的createChunkAssets方法:
    //如果是入口,则使用MainTemplate生成结果,否则使用ChunkTemplate.
    if(chunk.entry) {
        source = this.mainTemplate.render(this.hash, chunk, this.moduleTemplate, this.dependencyTemplates);
    } else {
        source = this.chunkTemplate.render(chunk, this.moduleTemplate, this.dependencyTemplates);
    }
Template是用来生成结果代码的。webpack中Template有四个子类:
-
MainTemplate.js 用于生成项目入口文件
-
ChunkTemplate.js 用于生成异步加载的js代码
-
ModuleTemplate.js 用于生成某个模块的代码
-
HotUpdateChunkTemplate.js
在MainTemplate和ChunkTemplate需要根据依赖的模块,逐个调用ModuleTemplate的render方法。下面分析ModuleTemplate是如何生成每个模块的结果代码的:
ModuleTemplate.prototype.render = function(module, dependencyTemplates, chunk) {
	var moduleSource = module.source(dependencyTemplates, this.outputOptions, this.requestShortener);
	moduleSource = this.applyPluginsWaterfall("module", moduleSource, module, chunk, dependencyTemplates);
	moduleSource = this.applyPluginsWaterfall("render", moduleSource, module, chunk, dependencyTemplates);
	return this.applyPluginsWaterfall("package", moduleSource, module, chunk, dependencyTemplates);
};
第一行module.source()方法即是生成该模块结果代码的方法。source是一个抽象方法,在Module的不同子类里会重写该方法。在子类NormalModule的source方法里,必须把源代码中的require()引入的模块代码替换成
webpack的模块加载代码,完成此功能的代码就是这句:
    //还记得dependencyTemplates是什么吗?就是保存Dependency和Template对应关系,下面这句从获取不同的Dependency.Template实例
    //如AMDDefineDependency.Template ,AMDRequireContextDependency.Template ,CommonJsRequireDependency.Template

	var template = dependencyTemplates.get(dep.constructor);
    if(!template) throw new Error("No template for dependency: " + dep.constructor.name);

    //source是一个ReplaceSource,可利用dep参数的range属性定位require调用在源码中的位置,从而实现替换。
    //range: 根据paser:acorn的文档说明,保存了AST节点在源码中的起始位置和结束位置[ start , end ]
    template.apply(dep, source, outputOptions, requestShortener, dependencyTemplates);
比如最终会生成类似以下的代码:
//原始文件内容是:    var kidsico =  require('assets/img/kids.gif') , closeico = require('assets/img/close.gif');
  var kidsico =  __webpack_require__(32) , closeico = __webpack_require__(33);
最后输出到结果文件
webpack会在Compiler的emitAssets方法里把compilation.assets里的结果写到输出文件里,在此前会先创建输出目录。所有当你要开发一些自定义的 插件要输出一些结果时,把文件放入compilation.assets里即可。
使用acorn生成AST,并遍历AST收集依赖
webpack使用acorn解析每一个经loader处理过的source,并且成AST,然后遍历所有节点,当遇到require调用时,会分析是AMD的还是CMD的调用,或者是require.ensure .
我们不再分析AST的遍历过程了。
对loader的加载和调用
webpack官网对 loader 已经介绍的非常详细了,不再多说。你只需要记住:
webpack在build模块时 (`调用doBuild方法`),要先调用相应的loader对resource进行加工,生成一段js代码后交给acorn解析生成AST.所以不管是css文件,还是jpg文件,还是html模版,
最终经过loader处理会变成一个module:一段js代码。
比如:url-loader,根据loader配置生成一段dataURL或者使用调用loadercontext的emitFile方法向assets添加一个文件。
经典插件
html-webpack-plugin
在HtmlWebpackPlugin里通过 var childCompiler = compilation.createChildCompiler(compilerName, outputOptions)创建了childCompiler, 然后调用childCompiler.compile方法进行编译,
使得HtmlWebpackPlugin也可以使用webpack的loader机制,如html-loader,handlebar-loader等等来处理template.最后从compilation对象中取出chunk和css注入到html 的head或者body里。
extract-text-webpack-plugin
extract-text-webpack-plugin 被用来抽取css样式到独立的文件,方便页面引用,因此必须配合css-loader使用。
ExtractTextPlugin.extract("style-loader", "css-loader?sourceMap!cssnext-loader") 这样的loader配置,第一个before参数style-loader会被省略掉不参与loader处理,真正
起作用的是第二个参数css-loader?sourceMap!cssnext-loader ,所以配置成ExtractTextPlugin.extract("css-loader?sourceMap!cssnext-loader")也可以。
首先在资源build的时候,使用ExtractTextPlugin的loader将创建一个childCompiler(类似html-webpack-plugin)对css(或者sass,)文件重新进行编译,将编译结果记录在module的meta数组里。原来的位置替换成一行注释:// removed by extract-text-webpack-plugin
编译完成后,在优化chunk的时候 ( optimize-tree 事件触发 )将每个module的meta数组取出来生成独立的css文件。
CommonsChunkPlugin
这个插件用来提取公共的module到独立的chunk文件里。如果只有一个entry是没必须用这个插件 。当有多个entry,可能每个entry有一些公共依赖的module。此时CommonsChunkPlugin会把这些公共的module提取
到独立的文件中。http://webpack.github.io/docs/list-of-plugins.html#commonschunkplugin有详细的介绍
UglifyJsPlugin
在optimize-chunk-assets时,将每个chunk逐一uglify一把,然后再输出结果文件。